Saturday, 27 October 2012

Teatime felt project and the Easiest Christmas Bauble – Ever!

Next up we have Rachael's felt roll challenge entry!

I was very happy to receive the “Jungle” felt roll in the felt roll challenge. I love this felt roll as it’s such a brilliant mixture of colours – you can go crazy with the truly bright blue and green shades or you can stick to the more natural greens and navy to create projects with a more muted calm and natural feel.  For the challenge I wanted to create a variety of makes using different techniques and different combinations of the jungle felt colours. My aim was to use the felt in combination with other materials so that I could create three dimensional forms that might not be normally possible with the felt alone.
In the end I ended up creating a tablemat, a butterfly brooch/fascinator and a non-traditional Christmas bauble.
 A favourite make of mine was the tablemat, this used fabric covered boning (the type normally used in corset making), some double sided tape, strong fabric glue (we used our old faithful Gutermann HT2) and a needle and thread.
To start making the table mat, you first need to cut strips of the boning up. You need to cut five 15cm strips and five 25cm strips. 
Then stick double sided tape on both sides on all your pieces of the boning. 
Cut  five 15cmx3cm and five 25cmx3cm strips of your felt to match your strips of boning - cutting along the length of your felt roll to give you long strips(I used “peasoup” and “deep sea blue” coloured felt from the roll and covered the longer boning strips in green and the shorter ones in the blue shade). Cover your boning strips with the felt strips by peeling away the double sided tape backing and pressing the felt strip around the boning.  
Now you need to glue your strips into tear drop shapes – pop a bob of fabric glue on both ends of the felt covered strip, bring the ends together , and then secure with a clothes peg to allow the glue to dry.
Repeat this process – transforming each strip of boning and felt into a teardrop shape and allow to dry.
When the teardrop shapes are secure you can start the final construction of your table mat. Put all the points of the teardrops together at the centre of your tablemat, alternating colours as you go. You will end up with a design almost like a snowflake or loopy star. Now using a needle and thread neatly stitch each loop to the loops next door to it (ladder stitch seemed to be best stitch to do this as it meant most of the stitching could be hidden in the layers of the felt). Then just carry on stitching like this until you have completed your tablemat – perfect!

The second project I wanted to share with you all is the Christmas bauble – it is just so easy that it’s the perfect make for supervised children – with a professional finish from very little expertise!

It’s so simple and all you’ll need a polystyrene ball, some pins, some buttons sequins or crystals, some fabric glue and a small piece of ribbon or trim for hanging.
Firstly cut lots of similar small shapes from the felt – (you could use any die cutting system suitable for felt or just old fashioned scissors are just as good) I cut all my flowers using a “Cuttlebug”,  but freehand flower,  leaf, or individual petals shapes would work just as well.
One you have all the shapes cut use the pins to attach them to the polystyrene ball – covering the whole surface. Use fabric glue (again I used Gutermann HT2) to glue on the crystals to the centre of the flowers and then finally pin on a loop of ribbon for hanging your bauble – see I told you it was simple!


 (P.S. If you don’t want to use buttons or crystals a cheaper option is to use pins with a coloured plastic or glass head to give interest to the centre of your flowers at the same time as actually pinning your felt flowers to the polystyrene ball)
Have fun!

Saturday, 6 October 2012

Felt Rose Garland Wreath with TUTORIAL

As you all know it was Felt Day at The Eternal Maker last Saturday and here, as promised, are the results of our staff felt roll challenge.......... As expected there were a complete mixture of ideas. Although, saying that, it was not expected that we would end up with, amongst other things, a Christmas Cactus and a set of Egg Clothes! (.......yes that is clothes for eggs!). What really amazed us was how much you can actually make from one seemingly small felt roll - Millie managed to squeeze out a fully fledged tea cosy and set of coasters (more on this later)!
Anyway, as promised we will be posting pictures and tutorials for you all in the coming weeks. In the end we really could not decide a winner so any feedback would be gratefully received. We hope our projects inspire you and if you have ago yourself be sure to show us the results - we love to see what everyone is up to!

First up is newbie staff member Louise with a Purple Haze felt roll............


For my felt roll challenge I wanted to make something unpredictable and settled on a floral garland, perhaps not as unpredictable as I'd have hoped but I love what I ended up with all the same. Initially I wanted to make a bib style necklace with lots of roses bundled together but by the time I'd made them all I changed my mind (typical)! After raking around in my stash I decided to add a couple of additional materials into the mix. For the challenge we were allowed to use up to three additional items so I chose wire and brown floral tape for the base of the garland, and some dark brown leather for the leaves. I think the purple hues from my felt roll mixed with the dark brown gave it an autumnal feel. Although it's all ravelled up on display it does unwrap to just over 7ft of lovely garland! And a bonus, it was SUPER EASY TO MAKE so I'm going to show you how to make the bigger roses and then you can create whatever wonderful crafty goodness you wish!
You will need:
  • 1 Felt Roll
  • Matching Thread 
  • Needle
Step 1
Unravel your felt roll. Each strip measures approximately 10cm X 45cm and you can get roughly three roses out of each colour so all together that's 18 roses! Cutting each strip into 10 X 15cm sections might make things a little easier, take a look at the photo for reference (although my photo doesn't illustrate this very well - sorry!), you'll need a 15cm strip for the rosebud (cut into a similar wiggly shape to the one in the photo) and a selection of petals ranging from small to large

Step 2
Once you've cut all your shapes out, it's time to sew them! Begin rolling your rosebud with the skinny end in the centre, adding stitches as you go to keep it from unrolling. 

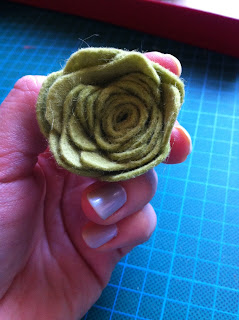
Once you've rolled it all the way, secure with a knot. Your rosebud should look something like this!

Step 3
Next up we're adding some petals! You want to sew a continuous line of stitches all the way around until you get to the last petal so your rose will be extra-secure! You want each petal to overlap slightly so the trick is to add a new petal part-way through sewing the previous one. Start with your shorter petals in the centre, getting larger as you work towards the outside. I've snapped more photos here for reference.


Once you've sewn all your petals, secure your thread and your rose should look something like this!
If you like the look of it like this, leave as is or if you want it a little fuller, pull the petals out backwards towards the stitching starting from the outside working your way around until your petals don't stay put anymore!
There you have it, cute little roses to add to whatever creation you like! They make beautiful brooches or hair flowers, you could even create a bouquet! If you want to make a garland like mine, just measure 6ft or so of wire, wrap with floral tape and glue your roses along the wire using felt scraps as a backing. The leaves were created using scraps of leather glued to a short length of floral tape covered wire (with a leaf at either end) and simply wrapped the wire once or twice around the garland where I wanted. To turn it into a wreath just coil it up to a size you're happy with and tie with twine!

Enjoy!

Louise ♥

Friday, 21 September 2012

Felt Day and Felt Roll Fun!


Did you know that here at The Button Company we do not just enjoy playing (sorry I mean working!) with buttons, but we supply many other products to retailers across the country and beyond. We have many strings to our bow, some are thread-like strings ( we are the distributor for the brilliant Aurifil quilting threads), some are fabric- y strings  (we distribute Japanese fabrics from Seven Islands Fabrics, Birch organic cottons, and lovely French cottons) and  my personal favourite is the felty string – we import and distribute “Woolfelt” within the UK.
Woolfelt is a yummy mixture of between 20 and 30% wool and rayon - it has enough wool fibre to mould forms and have that “folksy” felt look and enough rayon to make it durable and easy to use. It comes in many forms, full bolts, half bolts, bundles of pieces, felt charm packs and felt rolls (just like gorgeous mini felt jelly rolls!)

Here they are........

The rolls come in lots of beautifully co-ordinated colourways and are just perfect for creating small projects and inspiring some fun making time. With this in mind we have set ourselves a little challenge........ each member of staff here has been given a felt roll to take home to create some loveliness from – just to give you guys an idea of all the amazing possibilities that one little roll will have. The results will be posted online for your delectation and are due back in store just before Felt Day
Oh yes..... Felt Day........ I almost forgot to mention....... Saturday the 29th September is Felt Day at our sister shop The Eternal Maker. Head down to the store to take part in lots of felt based “make and take” sessions (no need to book just pop by any time between 10am and 5.00pm, prices start at £3.50 per person per project). We will be spending the day exploring creative possibilities with felt in all its guises. Alongside woolfelt there will be the opportunity to get your hands making, with wool roving (needle felting and wet felted balls) and specialist Japanese hard felt.  There are also pre-bookable classes running in the morning and afternoon  have a look at http://www.eternalmaker.com/class-timetable for more information - you can try your hand at needle felting, or fabulous three dimensional flower brooches.
So come along and join in the fun at The Eternal Maker, 41 Terminus Road, Chichester, PO19 8TX (01243 788174)
(If you are a retailer and would like any more information on any our wholesale products or how to set up a wholesale account with The Button Company please contact us at info@buttoncompany.co.uk or on 01243 775462 – we look forward to hearing from you.)

Friday, 3 August 2012

Gluing, sticking, threading and sewing!

A big thank you to all those who got up early after an epic night of TV (opening ceremony anyone?) to attend our Button Day extravaganza!!

 
After lots of gluing and sticking and threading and sewing, the fruits of your hard work appeared in the form of felt button brooches and purses, button coasters and heart hangers. The jewellery workshop was particularly well attended and as usual your creativity knew no bounds!


We had a fabulous day and really enjoyed sharing our buttony fun (and buttony cakes!) with you all - and if any of you are wondering about our giant button mural............. the news is............... it was added to on the day and will be unveiled soon! You'll hear more about this in a later post - as we'll have some very exciting news to announce........... so watch this space!


Thursday, 28 June 2012

Countdown to Button Day - One Month To Go!

Just like some other very important event happening this July.....(we can't mention names but we've heard there's something big happening in London!)...... we are excitied to announce that there is exactly a month to go before our Button Day!

Running on Saturday 28th July, Button Day will be a fun filled day celebrating all things buttony!

Throughout the day there will be Button themed "make and takes" - suitable for all ages - whether your 5 or 105 there is always something to love about buttons! From just £3 per person per project, our selection of brand new make and takes will inspire and excite you! Projects include a felt button penny purses, button coasters and button heart hangers!

You can spend some well deserved "me-time" at the Button Jewellery Work Station or enter our Button Card Making competition. (We have extended the closing time until 3pm on the day!)

There will also be a chance to add to our giant Button Mural and there may even be some buttony refreshments on offer as well! 

 So come and join in the fun - in store, at The Button Company and The Eternal Maker's home - 41 Terminus Road, Chichester PO19 8TX (01243 775462) any time between 10am and 5pm on Saturday 28th July 2012

(This is not, by the way, what we mean by buttony refreshments!)
Related Posts Plugin for WordPress, Blogger...
 

fast installation
Poster Boards